Small flakes on a leather jacket usually mean the surface finish is failing in a limited spot, not that the entire jacket is falling apart. When you treat it like a surface problem (clean, stabilize, blend, protect), you can often stop the flaking from spreading and make the area look calm again.
This guide is for light damage: tiny chips, small flaky patches, and early-stage peeling around cuffs, elbows, pocket edges, and seams.
If you’re dealing with larger areas, lifting sheets, or widespread shedding, the full system in this home repair hub for peeling leather jacket finish will help you choose the right path before you start layering products.
What this method works best on
This step-by-step approach works best when:
- The peeling is small and localized
- The finish is flaking like thin chips (not lifting in sheets)
- The surface underneath still feels like leather, not fabric mesh
- You want to stop the spot from growing and blend it cleanly
If the surface is lifting like a thin film (rather than flaking), you’ll get better results when you press and re-adhere the detaching surface layer first, then return here for blending.
What you’ll need (keep it simple)
For small flake repairs, you don’t need a big kit, you need the right basics.
- Microfiber cloths
- Mild leather cleaner (gentle is better)
- Cotton swabs (great for edges)
- Fine sanding pad or sandpaper (around 600-1000 grit)
- Painter’s tape (optional, for protecting seams and hardware)
- Sponge/applicator pad (or a clean makeup sponge)
- Flexible leather color/paint (only if color is missing)
- Flexible leather finisher/topcoat (matte/satin/gloss to match)
If you don’t want to guess what to buy, it helps to choose from products and kits that are commonly used for peeling jacket repairs, because compatible layers matter more than “strong” layers.
Quick check before you start (prevents accidental damage)
Check 1: Is it leather finish peeling or faux leather delaminating?
- If you see fabric backing or a plasticky layer separating like a skin, it may be faux/bonded leather.
- You can still improve the look, but the repair may need more frequent touch-ups because the coating itself is failing.
Check 2: Is it just surface flakes, or is it lifting?
- Flakes: tiny chips and crisp edges.
- Lifting: the surface looks like it’s peeling up as a sheet or bubble.
This article is for flakes and light chipping. For lifting, use the re-adhere method first.
Step-by-step: small flake repair that doesn’t spread the damage
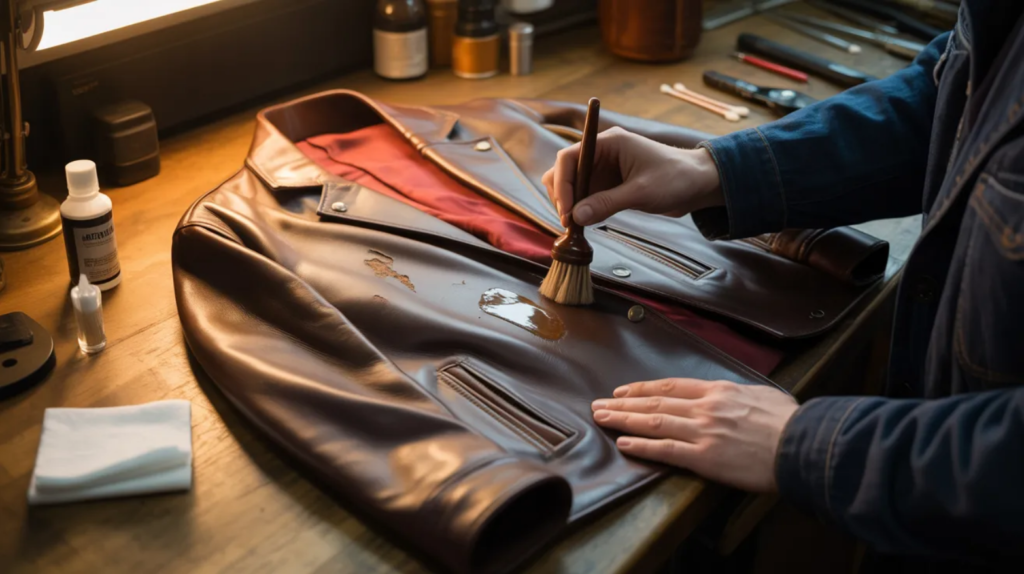
Step 1: Clean the area gently (adhesion starts here)
Wipe the area with a microfiber cloth and a gentle cleaner.
- Clean a little wider than the damaged spot (so your blend area is also clean).
- Don’t soak the leather.
- Let it dry fully.
A clean surface helps the new layers grip evenly, which reduces edge lift later.
Step 2: Remove only what’s already loose (the “no escalation” rule)
This is the moment where people accidentally turn a small repair into a big one.
- Lightly rub with your fingertip or a dry cloth.
- Remove flakes that come off with almost no effort.
- Stop when the edge feels anchored.
If you’re unsure whether to remove a borderline loose edge or seal it in place, use this guide that explains when to remove loose topcoat versus seal over it, it’s made for that exact decision.
Step 3: Feather the edge so it blends instead of “patching”
Once loose flakes are gone, you’ll often have a ridge where the old finish ends.
- Use very fine grit and extremely light pressure.
- Smooth the sharp edge until it feels less raised.
- Wipe away dust.
You’re not sanding the leather down. You’re softening the transition so the repair layers don’t stack visibly.
Step 4: Decide if you need color (many small repairs don’t)
Look closely under good light:
- If the area is still mostly the same color and only the clear finish chipped, you may not need color.
- If the spot looks lighter, duller, or shows a different tone, you’ll want a thin color layer before topcoat.
When color is missing, resist the urge to “paint it solid” in one go. Jackets flex, and thick coats crack.
Step 5: Apply color in thin layers only where it’s needed
If the damage exposed a lighter base, apply a thin coat of leather color/paint.
- Use a sponge or applicator pad.
- Dab lightly and build coverage slowly.
- Let each layer dry before adding another.
The goal is to match from normal viewing distance, not to create a perfect paint block up close.
Step 6: Seal with a flexible topcoat (this is what stops repeat flaking)
Once the area looks even, seal it.
- Apply a thin topcoat layer slightly beyond the repaired spot.
- Feather outward so the sheen transitions smoothly.
- Let it dry, then apply a second thin coat if needed.
Choose a sheen that matches your jacket. Many jackets sit closer to satin/matte than high gloss, so a too-shiny topcoat can make the repair stand out even if the color is perfect.
Step 7: Let it cure before stressing the area
A repair can feel dry quickly, but the finish needs time to settle.
For the next few days:
- Avoid heavy rain.
- Avoid tight folding (don’t crush it in a bag).
- Try not to aggressively bend the repaired zone (especially elbows and cuffs).
That patience is what turns “looks okay today” into “still looks good next month.”
Troubleshooting (fast fixes for common issues)
The edge still looks visible
That usually means the ridge wasn’t feathered enough.
- Lightly smooth the transition again (gentle, fine grit).
- Reapply thin topcoat layers outward to soften the sheen line.
The repair looks darker than the surrounding area
That’s often too much color in one layer.
- Let it fully dry first (don’t panic while it’s wet).
- If it’s still dark, you may need to lightly blend with thinner layers rather than adding more.
The spot looks right, but the sheen looks wrong
Sheen mismatch is one of the biggest reasons repairs look “obvious.”
- If it’s too glossy, switch to a more matte/satin finisher.
- If it’s too matte, a thin satin layer can restore the original look.
When to stop and switch methods
Switch away from this “small flake” method when:
- The surface is lifting like a film
- The area is shedding constantly
- The damage is widespread across panels
In those cases, you’ll save time and product by following the complete system in the main peeling leather jacket repair guide, because it walks you through stabilizing larger failures without trapping breakdown underneath.
Conclusion
Small flakes and light finish damage are often repairable at home because the leather is usually still sound, it’s the surface finish that needs rebuilding. When you clean properly, remove only what’s truly loose, feather the edge, rebuild color in thin flexible layers, and seal with a compatible topcoat, the peeling usually stops spreading and the jacket looks wearable again. That’s the real win: not perfection, but a stable, smooth finish that bends with you instead of cracking back open.