When a leather jacket’s surface starts lifting like a thin skin, it’s tempting to “paint it down” and hope it behaves. The problem is simple: a floating layer can’t hold a new layer. If you seal or recolor on top of a finish that’s already separating, the repair usually peels again, often in a bigger sheet.
This guide is for the specific moment when the finish is still mostly intact, but part of it is lifting at the edge, forming a flap, bubble, or curling border. Your goal is to bond it back down cleanly, then protect it so it doesn’t lift again.
If you want the full overview of how re-adhesion fits into the complete home repair method, this is covered in the main repair hub for peeling leather jacket finish.
A quick “two-minute diagnosis” before you glue anything
1) Is it lifting like a film, or crumbling into chips?
- Film lift: the surface rises as one piece, like a thin layer pulling away.
- Chip/flakes: brittle bits break off and leave scattered small spots.
This article is for film lift. If you’re seeing tiny flakes instead, you’ll get better results by repairing the edges and rebuilding the finish in a different sequence.
2) Are you looking at real leather finish… or faux/bonded delamination?
- If you can see woven fabric underneath the lifted layer, it’s likely faux/bonded material delaminating. You can still press it down temporarily, but durability may be limited.
- If the grain and leather feel remain, and only the surface coating is lifting, re-adhesion can work surprisingly well.
3) Is the lifted layer still “healthy”?
A layer that re-adheres well usually feels:
- Flexible (not crunchy)
- Smooth (not powdery)
- Intact (not breaking into dust)
If it’s turning to powder, re-adhering won’t hold for long because there’s nothing solid left to bond.
What you’re actually doing here (so the steps make sense)
A lifting finish is basically a bond failure between two layers:
- the jacket’s finished surface underneath, and
- the coating that’s trying to detach.
So your repair has two jobs:
- Create a clean bonding zone under the lifted edge
- Press the layer flat and keep it flat while the bond sets
Once the bond is stable, you can blend and protect. Without that stability, everything else becomes cosmetic.
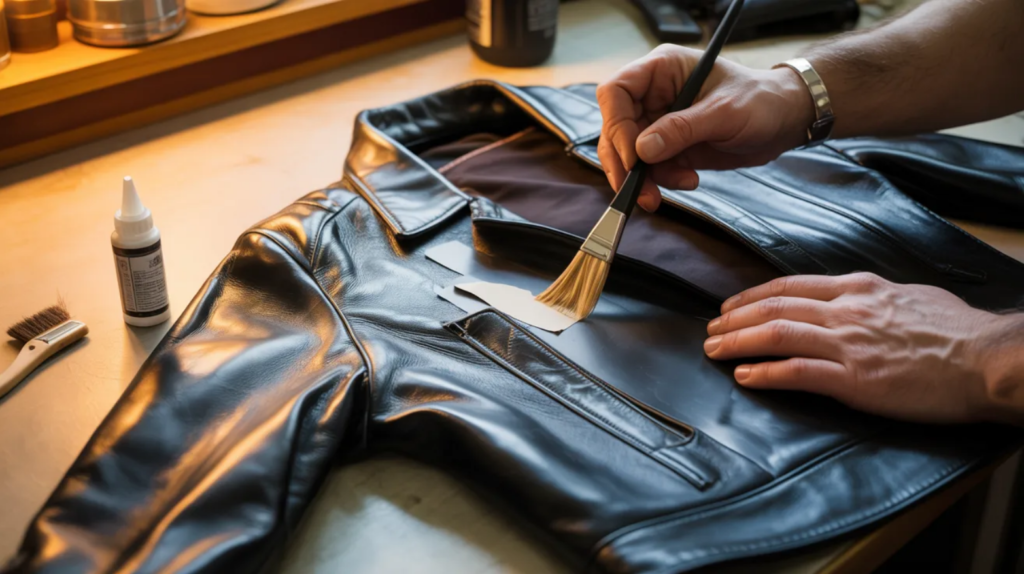
What you’ll need (minimal, but specific)
- Microfiber cloths
- Cotton swabs (for working under edges)
- Mild leather-safe cleaner
- Painter’s tape (optional, for controlling the flap)
- A flexible adhesive suitable for leather/fabric finishes (not super glue)
- A smooth pressing tool (a clean spoon back, plastic card edge wrapped in cloth, or fingertips with a glove)
- Wax paper / baking paper (to prevent sticking while pressing)
- A small weight or clamp alternative (stack of books, wrapped object, or gentle clips)
If you’re unsure what adhesive and finish products are compatible for this kind of repair, it’s safer to pick from products that are commonly used for peeling leather jacket repairs rather than improvising with household glues that dry rigid.
The re-adhesion method (built for lifting edges and small bubbles)
Step 1: Clean the area around the lift (and let it dry)
Wipe a little wider than the problem spot so you’re not bonding onto oils.
- Clean the surface near the lift.
- Let it dry fully.
- Avoid soaking the lifted flap, dampness trapped under it can weaken adhesion.
Step 2: Test the edge gently (don’t enlarge the lift)
Use a cotton swab to nudge the lifting edge.
- If it opens easily, you can work under it.
- If it resists and starts cracking, stop and treat it as a removal/blend situation instead.
Step 3: Prep under the flap (only as far as it naturally opens)
This part is small but important: you’re removing dust and loose debris from the bonding zone.
- Use a dry swab first to remove powdery residue.
- If needed, use a barely damp swab with mild cleaner, then allow it to dry.
You’re aiming for clean contact, not stripping the jacket.
Step 4: Apply adhesive sparingly (thin is stronger here)
Apply a very small amount under the lifted edge, not all over the top.
- Put a tiny bead on a swab or toothpick.
- Work it under the flap like you’re tucking it in, not flooding it.
- Keep adhesive away from stitching and exposed raw leather edges where it can darken.
A heavy application often creates lumps or a shiny line that becomes more noticeable than the peel.
Step 5: Press it flat, then “walk” the pressure outward
Press the flap down gently, then smooth from the center outward.
- Place a piece of wax paper over the area to prevent sticking.
- Use a wrapped card edge or the back of a spoon (soft pressure).
- Move slowly so trapped air can escape.
If you press too hard too fast, adhesive can squeeze out and leave a visible ridge. Slow pressure gives the finish time to settle into place.
Step 6: Hold it in place while it sets (this is where repairs succeed)
Bonding needs stillness.
Choose one:
- Wax paper + a flat object + light weight (best for smooth areas)
- Gentle clips (only if the area allows and you protect the jacket with cloth)
- Your hand press for the initial set, then weight
Leave it undisturbed for the time your adhesive requires.
Step 7: Remove the press layer carefully and inspect the edge
After it sets, remove wax paper slowly.
- If the edge sits flat, you’ve stabilized the failure.
- If a tiny edge still wants to lift, repeat with a micro-amount of adhesive only on that edge.
Avoid turning one small re-adhesion into a large “pull and repaint” situation.
After re-adhesion: do you seal now, or blend first?
Once the finish is bonded back down, you’re usually left with one of these:
Scenario A: It’s flat, but the border looks rough
That’s a topcoat-edge problem, not a bonding problem anymore. You’ll want to decide whether to remove only the loose border or seal it neatly, which is exactly what this guide covers when choosing between removing loose finish versus sealing over it.
Scenario B: It’s flat, but the color line is obvious
That’s a blending issue. Instead of repainting the whole panel, a controlled touch-up can often calm the spot so it disappears at normal viewing distance.
Mistakes that quietly ruin re-adhesion repairs
- Using super glue or rigid adhesives that crack when the jacket flexes
- Flooding adhesive under the flap (creates lumps and shiny ridges)
- Pressing without a barrier (you end up bonding your press material to the jacket)
- Sealing or painting before the re-adhesion bond is stable
- Pulling the flap “just to clean under it” and accidentally doubling the damaged area
When re-adhesion isn’t the right move
Re-adhere when the layer is intact and simply lifting.
Switch strategies when:
- The lifted layer is brittle and breaks when touched
- The area is shedding continuously like dry paint dust
- Fabric backing is exposed across a larger area (common in faux/bonded delamination)
In those cases, it’s often better to stabilize by controlled removal, smoothing, and rebuilding, because the original layer no longer has the strength to be “saved.”
Conclusion
A lifting jacket finish is a bond problem first and a beauty problem second. When you clean the bonding zone, apply a flexible adhesive sparingly, press the surface flat with patience, and let it set without movement, you stop the separation from spreading and give the jacket a stable surface again. After that, blending and sealing become straightforward, because you’re working on something that’s finally holding on, instead of something that’s already trying to leave.